Someone new to Adobe Photoshop was asking me yesterday how to work with images, and this is particularly useful/important if you’re updating websites as you want small images that’ll load quickly and look good when they’re on the site. (In this demo I’m using Photoshop CS2, but it’s quite basic functionality that I know has been around for quite a few versions if not since the very beginning.) The first thing to know is how to resize images in Photoshop. 1. Open the photo/picture in question in Photoshop (open Photoshop and go to File >> Open from the top menu, or drag your picture file over the Photoshop icon on your computer).

2. From the menu along the top of the screen, select “Image” and from the drop down select “Image Size”.
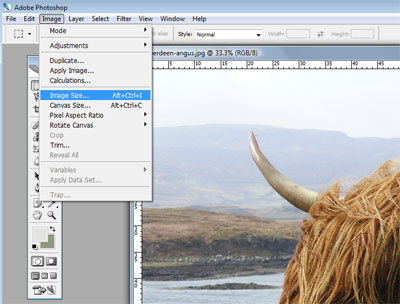
3. In the box that pops up, put in the width and height you want your image to be. The default here is pixels – if you don’t know the pixel dimensions you want, you can click on the drop down menu where it says “pixels” and select “percent”. If the “Constrain Proportions” box is ticked (and I’d advise it should be for most jobs) then altering the height OR width will automatically update the other to the same scale so that the picture stays in proportion. If you’re not hot on your pixels, as a very rough guide, all the pictures in this tutorial are 400px wide. If you want to change the image size based on other criteria (cm, inches etc) use the second set of drop down boxes. To change the resolution of the pic, type your desired resolution in the box. 70 is fine for web – go for 300 for print.

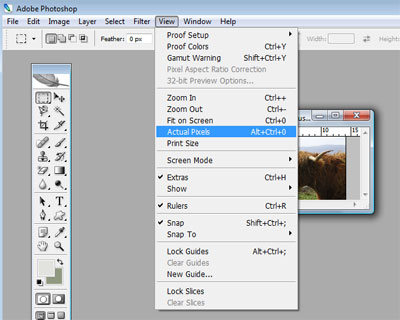
4. Chances are when you were viewing your image full size – if it was huge (a photo straight from a digital camera for example) Photoshop was displaying it at a scaled down size so it would all fit nicely on your screen. Therefore, once you’ve resized it, Photoshop may keep that scaled down idea and show you your resized version as being quite tiny. But don’t worry – it’s not – it’s the size you told it to be. Photoshop is just showing it smaller. To view it in it’s actual size, go to “View” in the top menu and select “Actual Pixels”. Photoshop will then update the view of your picture to be accurate – you may need to make the window it displays in larger (by clicking on the bottom right corner and dragging) to view it properly.
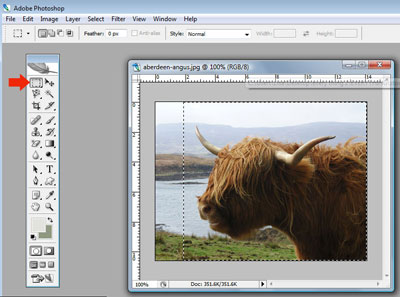
5. To crop a picture, select the icon on your Tools palette that looks like a little square made up of dashed lines (pointed at below with the red arrow). Then move to your image and click and drag your mouse to draw a rectangle of any size you want over the picture… you’ll see a flashing dashed line after you unclick your mouse, showing you which part you’ve selected.
6. The go to “Image” and “Crop”.
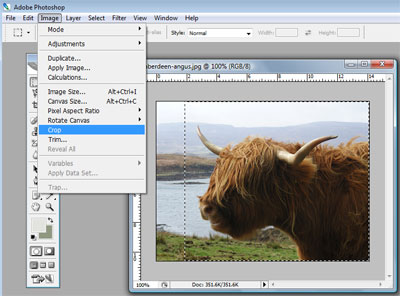
Ta da! You’ll have cropped your image! Sometimes you might want to crop an image to a particular size, or make it square. If the design of your website calls for square images, it can keep it looking nicer and neater to have them all matching. The steps below show you how to state a size and make square images of that size. 7. So imagine you hadn’t just clicked “Crop” in step 6, and you hadn’t drawn your flashing line in step 5. You’re looking at your picture, and you’ve got the icon that’s made up of a square with dashed sides (“Rectangular Marquee Tool”) selected. In the tool bar along the top of the screen, find the “Style” drop down menu, and select “Fixed Size”.
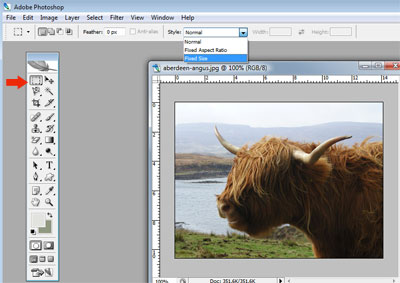
8. With “Fixed Size” selected, fill in the width and height you want your square/designated shape to be. In my example, because I want to make a square image, I’ll go with the shortest side of my picture and I know from when I resized my image that it’s 300px tall. (Or I can remind myself of it’s height by going to Image >> Image Size as in Step 2.)
![]()
9. Then you can click anywhere on my image and the flashing dotted line will appear, in the fixed proportions that you stated. If you don’t like where you clicked, just click somewhere else and the box will move. Once you’ve picked your space, go to “Image” >> “Crop” again (as in Step 6).

Now you have a perfectly sized and cropped image!

FAQs/Troubleshooting:
Can I make an image bigger rather than smaller?
You shouldn’t really, as the image will distort (unless you really know your Photoshop and have a recent version – but that’s another tutorial!). It’s amazing how just a little bit of blurring from making an image bigger can really ruin the overall look of a site/piece of art work that it’s used in.
I can’t find the Rectangular Marquee Tool…
Go to the top left of the Tools Palette and right click your mouse on the icon there – a window will appear where you can select between Rectangular Marquee Tool, Elliptical Marquee Tool, Single Row Marquee Tool and Single Column Marquee Tool.
I don’t have a “Tools” palette / I don’t have an “Options” tool bar.
If you can’t see some of the interfaces listed in this tutorial, go to “Window” along the top of the screen and tick the options there until you can see what you’re looking for! The box with all the little icons is Tools and the bar along the top where you can select sizes / Fixed Size etc is Options.


