WordPress are now onto version 2.9.2 – but the fundamentals are the same since 2.7, so use the guide below to help you out!
Written December 2008:
If you’ve just got a WordPress Blog, it should be version 2.7. And if you’ve used WordPress before, you’ll notice the layout this time around is pretty different. So here’s a whistle stop tour of how to use your blog, whether you’re using it as a blog, or as a website/blogsite.
Click on any image in this guide and a full size version will open in a new window so you can see what you’re looking at!
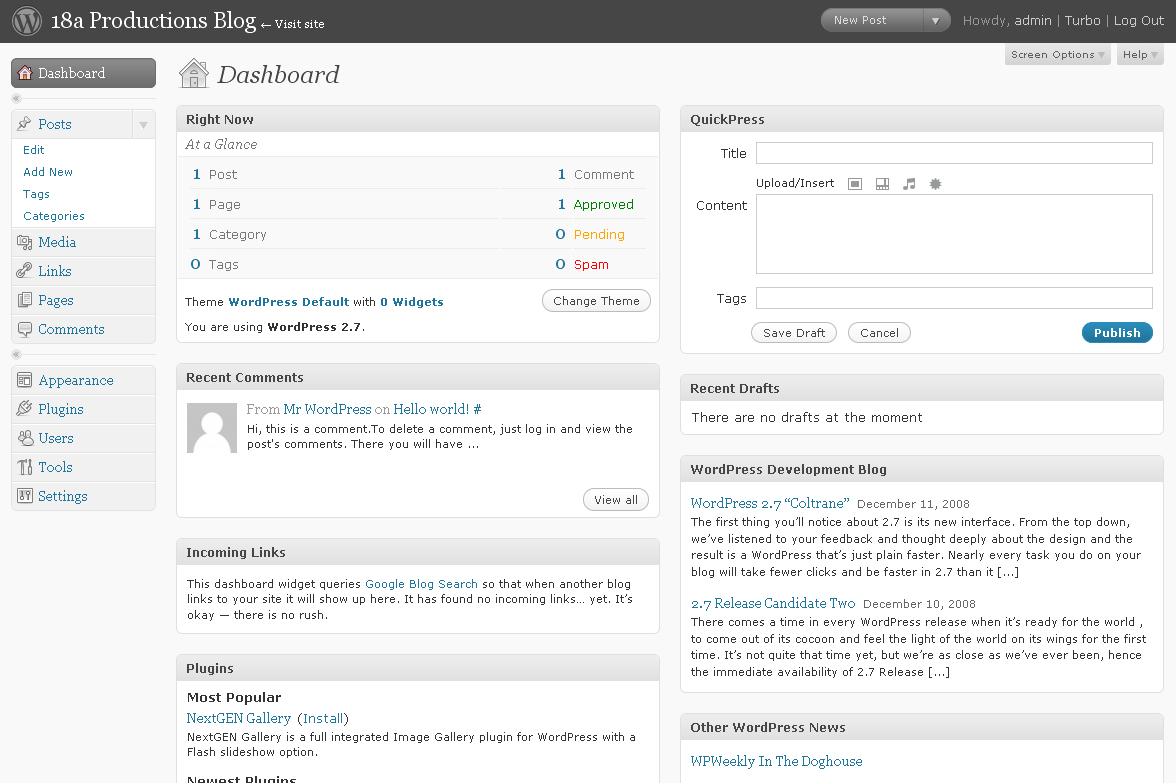
1. Dashboard The new-look dashboard is what you see when you first log in. It allows you to quickly post a blog post (an article written on a blog), or just generally see everything at a glance.
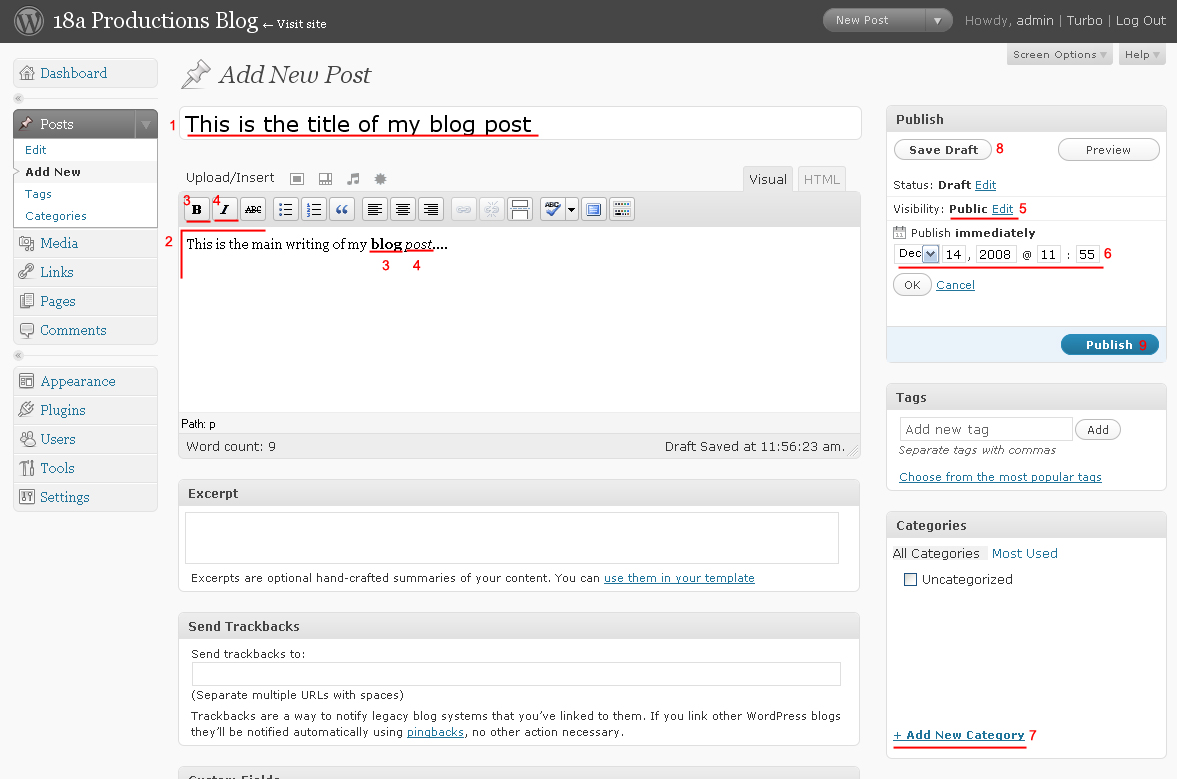
2. Writing a blog post: To write a blog post, click ‘add new’ from the Posts section of the left hand menu (top section). You will then see this screen – I’ve numbered the key features (click on the image below to see a bigger version):
1. This is where you type the title of your post.
2. This is where you write the content of your post.
3. If you want to put something in bold, highlight it with your mouse and click on the B icon from the formatting bar.
4. If you want to put something in italics, highlight it with your mouse and click on the I icon from the formatting bar.
5. If you want to password protect your post, you can do so here.
6. If you don’t want to publish your post yet – you want to write it now, but have it appear on your site tomorrow for example, edit the settings here.
7. You can categorise your blog posts – add a new category here, or once your blog’s set up how you want it, select a category from here. You can also use the Categories option from the left hand menu (Posts >> Categories) to edit/arrange these.
8. If you want to save your post to finish later, click here.
9. Don’t forget, you have to click the publish button for your post to show anywhere!
3. Add a link to a post.
To link to another website from your post, select the word(s) you want to be the link, and click on the icon of a link of a chain from the formatting bar. A box will appear where you can fill in: The website you want to link to. The option to pick whether the link opens in a new window. A title for the link. A class (beginners don’t need this).
To delete a link, select the text again and click on the icon that shows a link from a chain breaking.
4. Add an image to a post. Do add an image to a post, click on the square icon to the right of Upload/Insert (above the box where you’re writing your post). If your computer has flash installed, you’ll see the following screen. If it doesn’t, you’ll see the similar looking ‘browser uploader’.
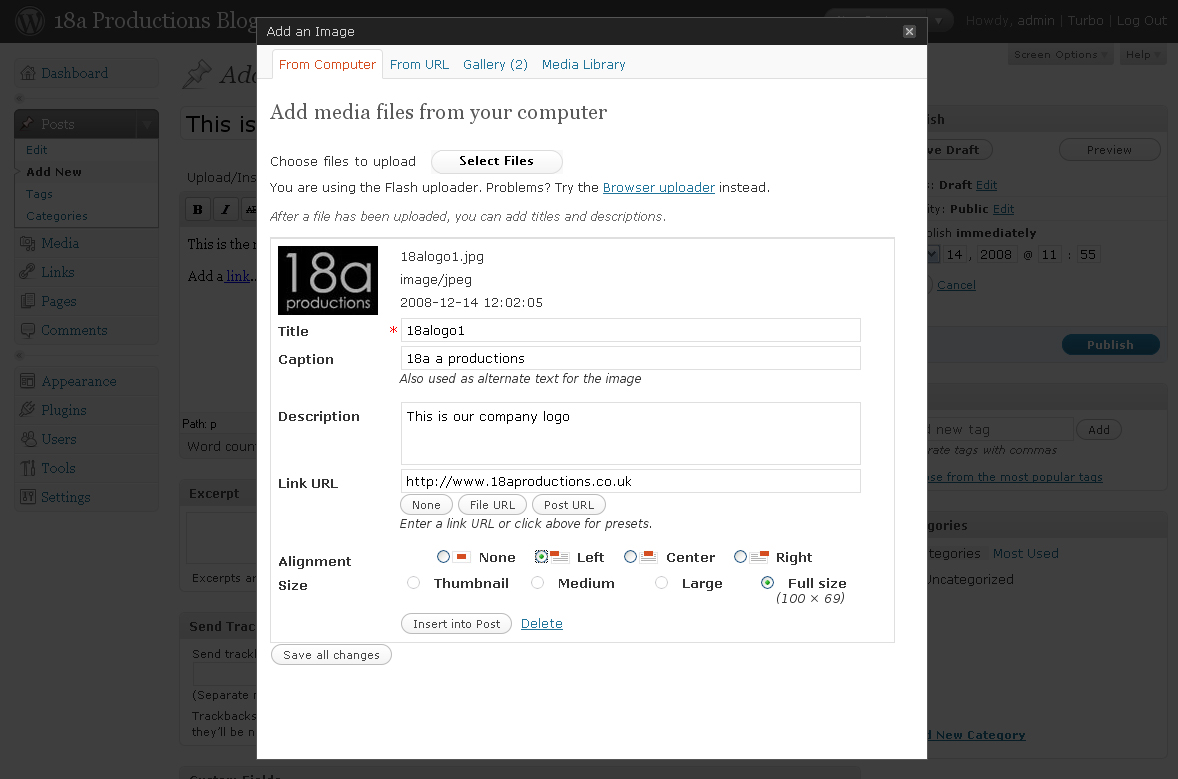
Select your image from your computer (like you’d add an attachment to an email – click on ‘select files’ and find the file on your computer) and you’ll be moved on to this screen:
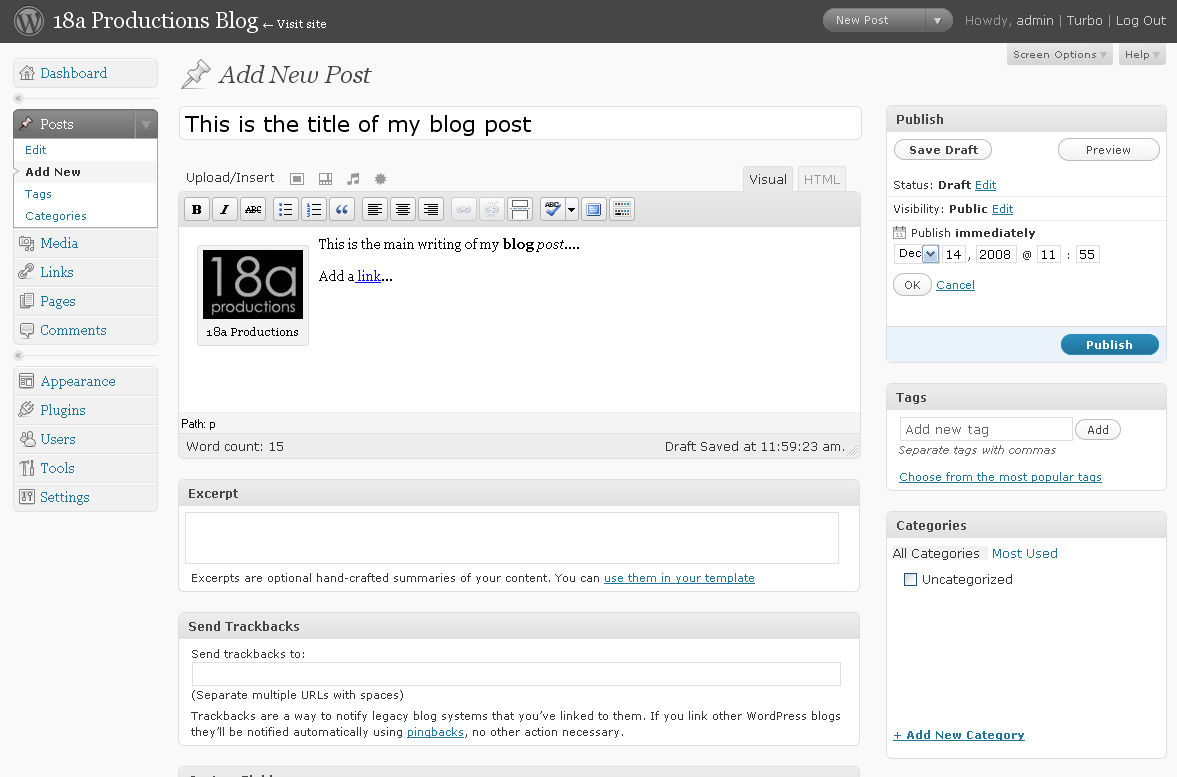
If you want a caption to appear under your image in your post, then fill in the caption box. If you’d like your image to have a description, or link somewhere, fill in the following areas. If you’d like to lay your page out nicely, and align the image within/around your text, pick which layout from the options there. You can also choose whether the image appears full size, or thumbnail, medium or large. Once you’re done, click on ‘Insert into post’. That should give you this:
5. Links Your blog probably has a few links in the ‘blogroll’. If you don’t want some of these there, you can get rid of them under Links >> Edit.
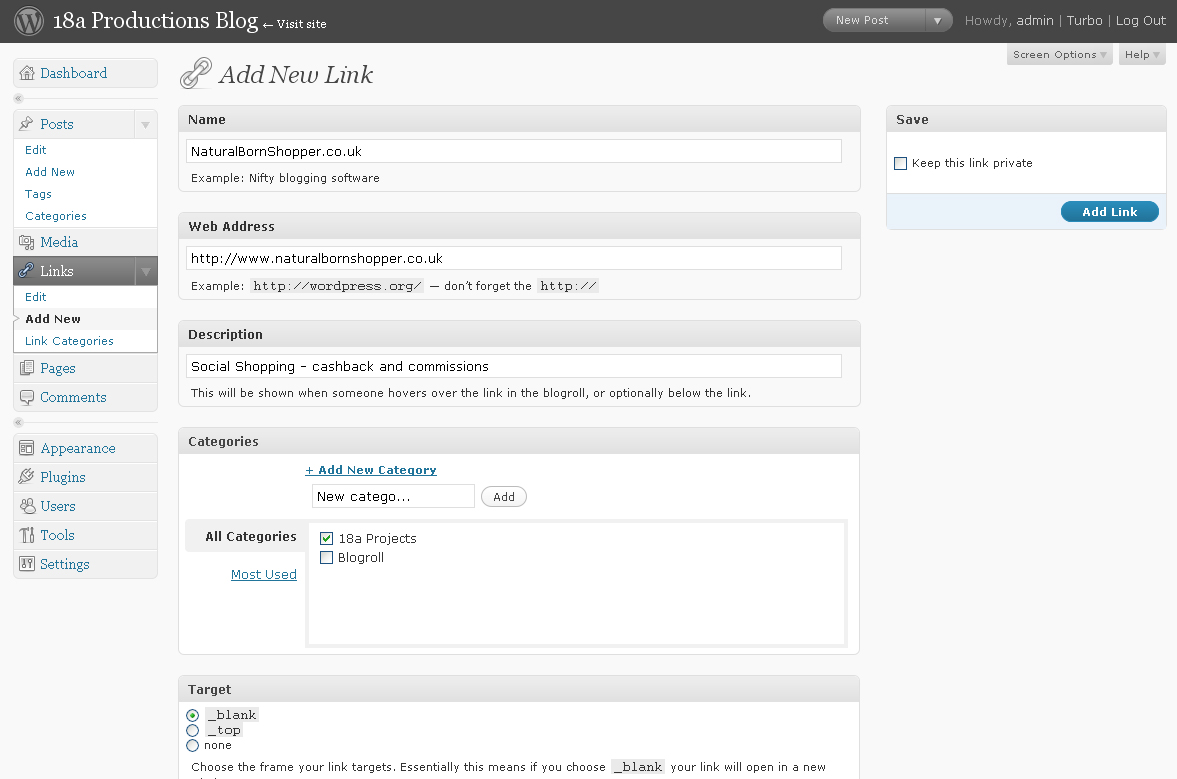
To add a link, select ‘add new’ from the Links section of the left hand side menu, and fill in the form thus:
Again, you can categorise your links, using the ‘categories’ option in the Links menu, or by adding them/selecting them here. ‘Target’ refers to how the link opens – if you want a new website to open in a new window when someone clicks on the link, select _blank.
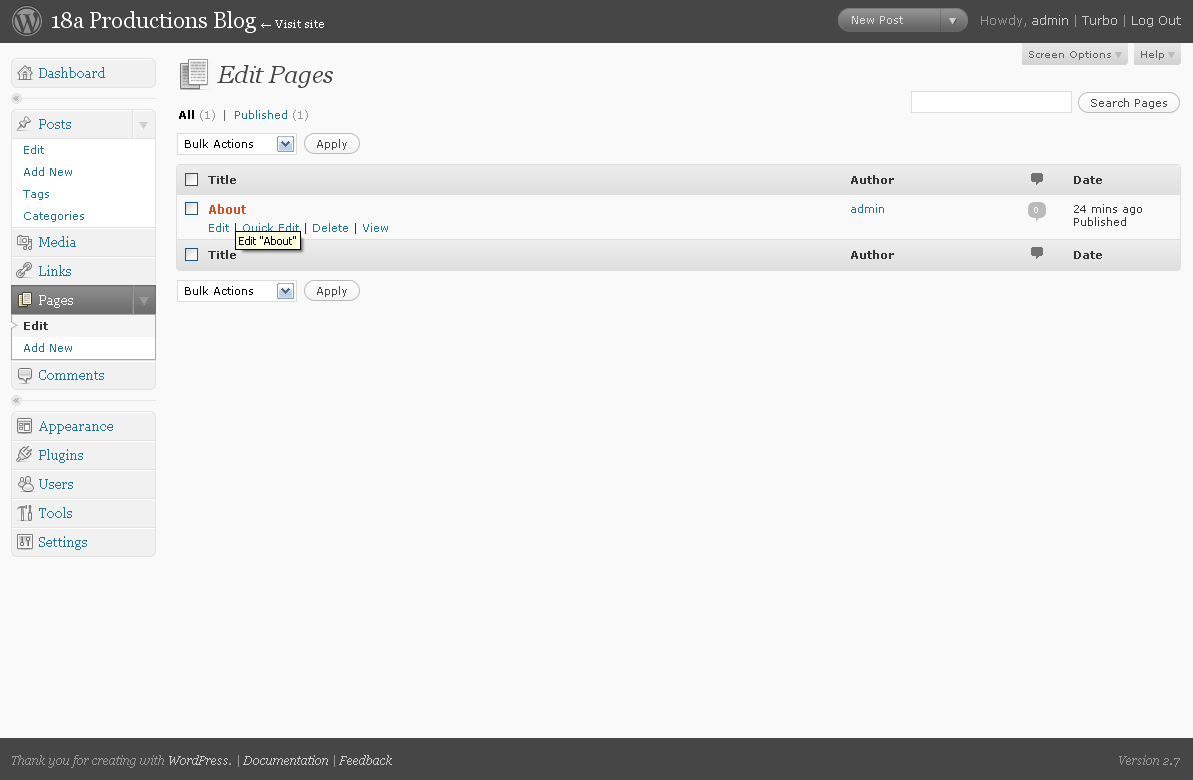
6. Pages WordPress doesn’t just let you write posts; you can write and edit pages, meaning you can use your blog as a blogsite/website. From the Pages menu on the left hand side, selecting ‘edit pages’ shows you what pages exist already. Hovering over the name of a page shows extra options, including edit:
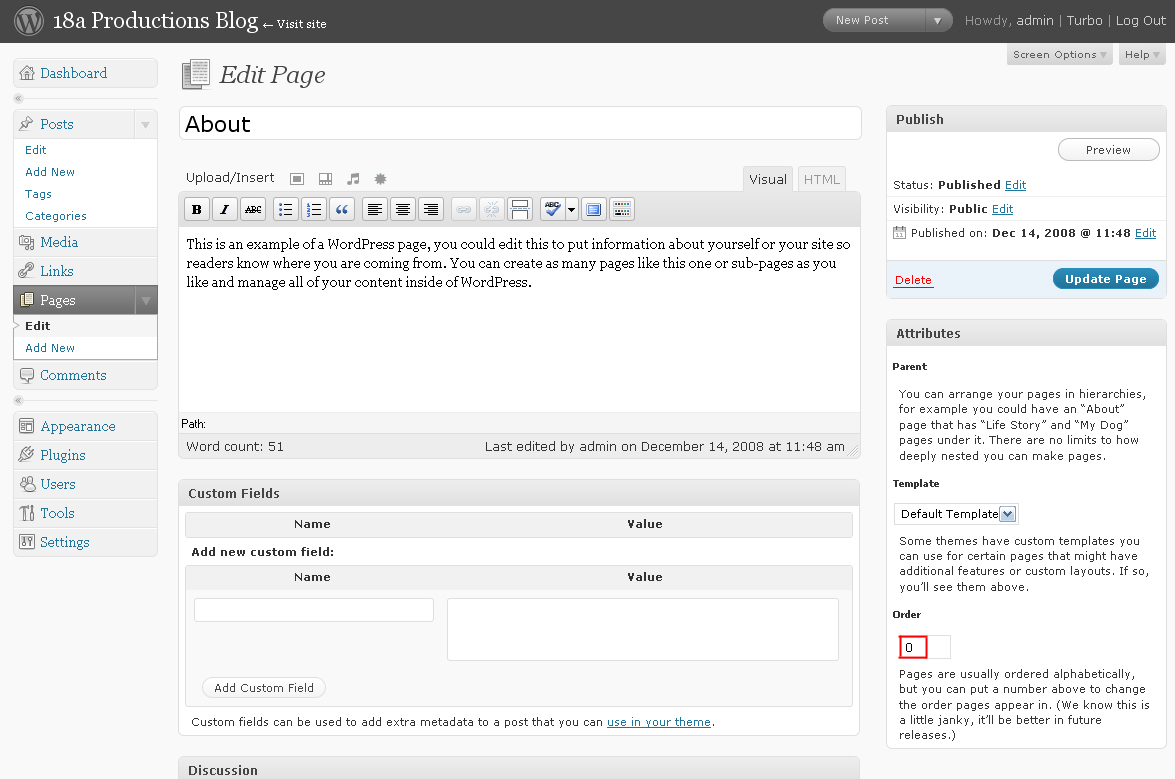
Adding and editing a page then look pretty much the same as the Post page. You have the option in the bottom right though, to give the page a number so your pages appear in a particular order. You can add a page by clicking on ‘add page’ from the Pages menu on the left.
So those are the basics – here’s a quick run down of some other options:
Comments: You can use the pages in this menu section to approve or delete comments left on your blog. If you’re on the ‘edit comments’ page hovering over any comment shows options of what to do with it.
Appearance >> Themes: Here you can select different themes for your blog to change the design of it. Ask your web developer how to add more themes – and don’t change the theme if you’ve had a customised one made!
Appearance >> Widgets: These are extras you can add to the sidebar on your blog.
Appearance >> Editor: This allows you to edit the code of your selected theme so you can change how your blog works – seriously, leave this to your web designer/developer!
Appearance >> Header colour and image: If you’re using the default WordPress theme, this lets you change the blue to whatever colour you want.
Plugins: There is soooo much functionality you can add to your WordPress blog by adding plugins, but that’s a post for another day…
Users: If you want to manually add other users to your blog, maybe other people in your company should be able to update the blog – you can do so here. Different subscription types allow people to do more or less accordingly. See here for a list of what the various subscription types allow. You can also edit your profile here, even down to picking a different colour scheme for the admin if you want!
Tools: This whole section is pretty advanced… the one bit you might want to use though is ‘export’. If you don’t have access to your database to make backups, just clicking on the button on the Export page once in a while will give you some kind of back up you could give your web developer in case of emergencies!
Settings >> General Settings: Check these are how you want them to be.
Settings >> Writing: Amongst other things, gives you the option to set which category posts go into by default, and instructions on how to post by email.
Settings >> Reading: Lets you select if you want a page as the first page, rather than your latest posts (to be used for blog sites in many cases), and how many posts etc should appear per page.
Settings >> Discussion: Go through these options and pick your preferences with regards to people leaving comments etc.
Settings >> Media: State what the thumbnail, medium and large image sizes are.
Settings >> Privacy: Umm – for those who don’t want their blog indexed by Google – sorry, I don’t know anything about that world!
Settings >> Permalinks: Get your post titles in the URL of your blog for help with Search Engines. I’d recommend Day and name or Month and name.
Settings >> Miscellaneous: You’re really not likely to need this!
Ok – I think you’re done! Happy blogging!
