Setting up Shop
We were approached by a client to design and build a new website on WordPress. Their current site needed re-vamping and bringing up to date, however the main reason for this update was also to incorporate a shop on the site, where customers could purchase products on-line. After evaluating the client’s requirements we opted for the popular WordPress shop plugin, WooCommerce.
A key part of the brief was that our client has lots of wholesale customers and wanted the new shop to have the ability to offer different account customers different rates, whilst showing a standard rate to non-logged in visitors. After researching various plugins we opted for the VarkTech Wholesale Pricing for WooCommerce plugin, and upgraded to the Pro version so that we could stipulate different roles with different discounts. It’s not the most slick user experience, but it does the job!
To manage Roles, you’ll also need the WPFront User Role Editor plugin installed.
The way it works is that you create different account types (roles) which you can assign to a customer/user, and you give each role it’s own discount amount. So we’ve created “roles” called “5% off”, “10% off” etc. and given them the appropriate discount rates. Our client can then assign their customers to the right role, depending on what price they should see when they log in.
Walking through it…
Firstly, you need to create your “Roles” and the “Rules” to support them. You can add a new role by clicking on the “Roles” tab in the dashboard and then “Add new”. Each new role needs a display name – for example: “Wholesale buyer 25% off”.
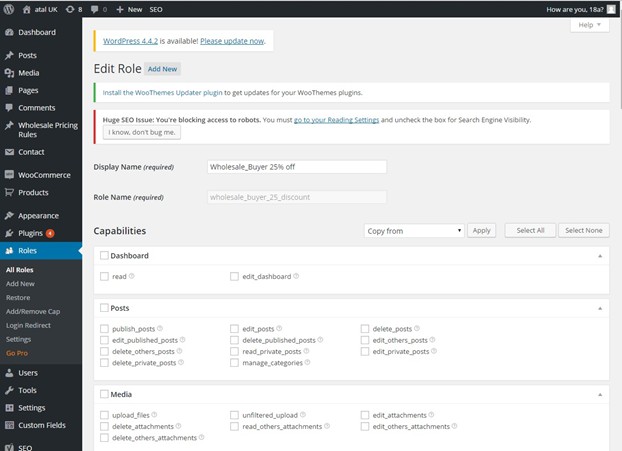
The first time you create a role, you need to tick the “read” box from the “Dashboard” section, and “wholesale” and “buy_wholesale” from the “Other Capabilities” box.
Once you’ve done your first role, you’ll be able to use the “Copy from” drop down to select an existing wholesale buyer to copy the format of and select “Apply” to ensure the correct boxes are ticked.
Once you have added a new wholesale role, you will need to add a new wholesale rule by selecting “Wholesale pricing rules” from the left hand menu and then “Add new”.
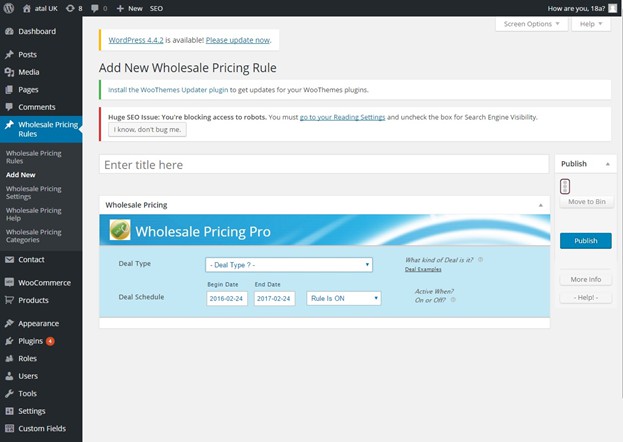
Here, enter the discount amount in the title and the use the “Deal type” dropdown and select “Discount by category, logged-in role, product”. You can then select the product type by the product filter, either “by category, logged-in-role ..” or for a single product. For the single product you will need to add the product ID.
Once you have selected the deal type you can then select the “Logged-in” role this applies to by selecting from the “Logged-in role” dropdown. In the discount amount box, select “% OFF” from the dropdown and a box will appear for you to input the percentage you want to discount by.
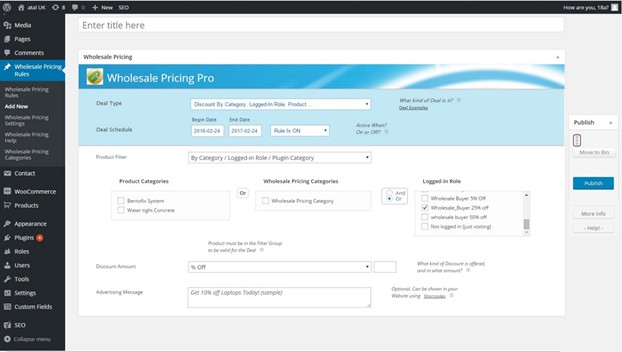
This must match with the wholesale buyer role you have selected.
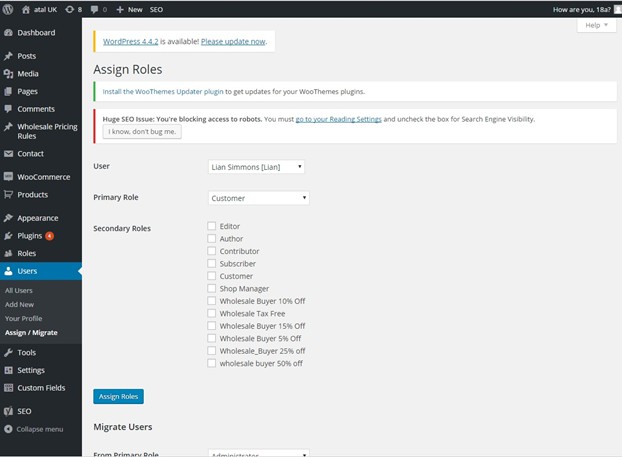
You can then “Assign a role” to a user by visiting “Users” in the dashboard, hovering over their name and selecting “assign roles”. A wholesale member will only see their special rate when logged in and will see the regular price when logged out.
Meanwhile, you add products and their regular price using WooCommerce as normal.
Update: This article was written in 2016. For more up to date information about wholesale plugins for woocommerce, including a quiz to help you decide on the right plugin for you, you might want to visit Barn2’s guide on the subject.

