In my day job we build a lot of HTML emails – and most of the time, these are built to be sent via systems such as MailChimp, DotMailer, CampaignMonitor or similar.
These systems are built to send emails to mailing lists of tens or millions of people, help you manage your mailing list, and let people unsubscribe when they’ve had enough of you!
However, from time to time a client comes along who needs to send a pretty, branded, personalised HTML email to just one person. These mailing list systems seem like overkill and so they result to trying to send it via Microsoft Outlook. Whilst in theory, Outlook can send HTML emails AND it has a templating feature, the two, I think are quite separate features. The template feature on Outlook is more about short emails you find yourself sending repeatedly. Meanwhile the HTML email sending system requires you to upload HTML code which can feel a little complicated for people who aren’t techies… and, well, call it HTML email builder snobbery, but the developers I know aren’t convinced that Outlook will send the code all that smoothly. It has a reputation for messing with the code a little, adding in extra styling if you type any changes – and so just generally breaking all the testing work that was done across email recipients prior to the template being inserted.
The other concern with sending emails with Outlook is that you really do need to keep the email designs incredibly simple. As soon as you try to add an image or change the amount of bullet points you’ve got, a non-techy is going to run into problems – even if they don’t know it. Bullet points that looked great in the tests could lose all their formatting and alignment when it lands in the recipient’s inbox.
Can you use MailChimp to send individual emails?
So if Outlook isn’t a great idea, what can you do instead? Well you could use MailChimp. Yes, it is overkill really, but if you want a tested email to render properly for everyone, and you want to be able to edit an elaborate template in a bullet proof template editor, safe in the knowledge you’re not breaking anything, then you need a system built for that. And MailChimp is one such system.
To get started, assuming you want to edit a beautiful template you’ve had designed and built especially for you, you’ll need a MailChimp Standard account – they call it “standard” but it’s actually their 3rd tier of package – do you see what they did there? Hmm, clever. It weighs in at $14.99 a month. It used to be free to upload your own templates but I noticed that this feature got moved to a paid account during 2019.
If you’re not bothered about a custom designed and built template however, you can still follow this guide to do this on a free account.
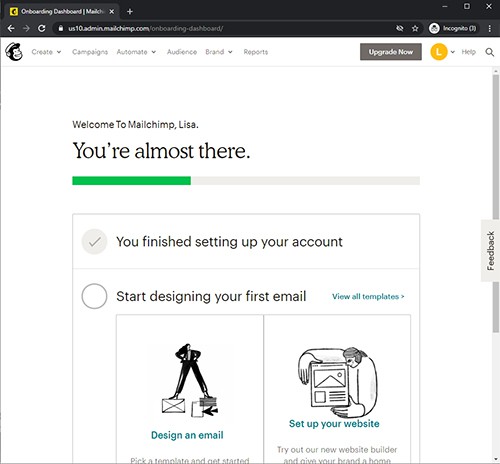
So, once you’ve signed up for MailChimp, you’ll need to fill in some details about yourself, and your business. By the time you see this screen you’re pretty much done with the Onboarding:

There are links on this screen to do some next steps, but if you’re only sending an email to one person, you can pretty much just hand your login details over to your developer at this point so they can come along and set up your custom HTML email template.
Setting up your MailChimp Audience
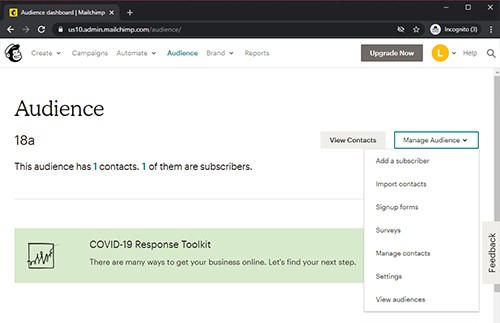
The next time you come back to your account after a developer has actioned something for you, or if you’re at the onboarding screen but just need to get going with a single email recipient, just click on Audience from the top navigation bar.
When you created your account, MailChimp will have created you an “Audience” (“mailing list”, to you and I) with the title of your company name – or if for any reason it hasn’t select to create an Audience. Assuming you’re looking at your first (and only, if you’re on a free account) Audience, click on the “Manage Audience” drop down on the right and click on “Add a subscriber” to add your solitary email address.

On the following screen enter their email address, first name, last name and tick to confirm you’ve got permission to email them. This is where GDPR comes in – you must have permission to email them and when you add people in this way MailChimp won’t send them a double opt in email so it’s asking you to confirm you’re doing things in the proper way. Generally, when we get asked how people can send emails to one person at a time it’s to send internal HR emails, or pretty emails to customers they’re having a one-to-one conversation with so GDPR is taken care of.
Creating your email
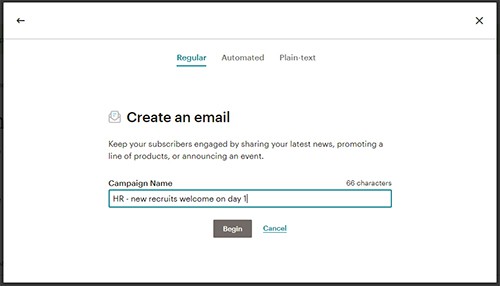
Now your solitary contact is in your Audience, hit “Create” at the top left of the screen next to the MailChimp logo and select “Email”. You can also press “Campaign” from the top navigation and select email from there. On the “Regular” tab, type in the name of your campaign – this is your reference for this particular email. If you’re going to be using this system to send more than 1 different email to a user (as in, differnet content / different purpose) write something here that reminds you what this particular email is for, as well as who it was to.

Next, you’ll be walked through adding the To (as in, select your one and only audience with no segments and tags), From, and Subject of your email. When you get to Design, you’ll come to a page called “Select your template” from where you can select “Saved templates” to see the one(s) your developer set up for you. Or if you’re not using a custom branded template, you can browse the MailChimp options.
Click on the template you’re using and then edit the content to what you need. If an email has been set up as a template for you by a developer, then you’ll be able to click on all the parts you needed to edit to change them, duplicate them, or remove them. The joys of using the MailChimp template editor with a custom template is that you can have a long design produced with lots of blocks and you just choose the ones you need for that particular mailing.
I’ve found this video on YouTube that shows you – in about the first 10 seconds from when you play the embed below – how you can click on things to edit them:
Once you’ve made your changes, click the teal “Continue” button from the top right of the screen. You’ll be taken back to the page where you entered your To/From/Subject details and you’ll be able to press “Send” from the top(ish) right.
And that’s you done! From the “Campaigns” tab in the top nav bar you’ll be able to see a report on if your recipient received and opened your email.
What about next time?
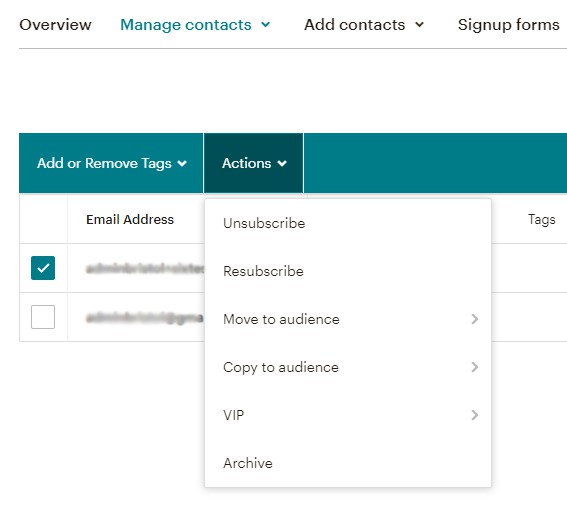
So next time, you’ll need to visit “Audience” and click on the grey “View contacts” button above and to the right of your screen. Tick the box next to your previous contact and select the “Actions” drop down which will appear. It’s up to you whether you Unsubscribe people or Archive them – I’d opt to Archive them so you can still see reports on the emails you’ve sent them, but they won’t be sent any new emails and they don’t count towards your MailChimp allowance.

Next, it’s back to the “Audience” page and “Manage Audience” drop down, and “Add Subscriber”. And then create your next campaign. It sounds like lots of steps, but you’d get pretty smooth at it once you’ve done it a few times.
Setting up lots of recipients at once
The process described here assumes you’ll be emailing individuals at different times – but if you’ve got a bulk load of people to do in one sitting, or you know the full list of addresses you’ll ever email even if you’re not mailing them all at the same time, you may find it quicker to subscribe everyone to your audience at the same time. You can add them one at a time, or even upload them via a CSV file.
Then you can tag them with their name so everyone has a unique tag, and on each campaign, when you’re setting up your To/From/Subject details, select that you only wish to email that particular tag – meaning it will only go to them. This is probably a good idea if you not only know your whole mailing list up front, but you’ll also need to send them a version of the email more than once.
You’ll still need to send a new “Campaign” for each email, but you won’t be going backwards and forwards to the “Audience” screen.
One final note
If whilst you’re sending your campaign you see the option to send yourself a test and you wonder why you couldn’t just send that test to your individual recipient – well, you could. But then you wouldn’t have any stats on them, which you might as well take advantage of if you’re using a system like this, and the unsubscribe link that MailChimp has to insist on wouldn’t work. Plus MailChimp limit the amount of tests you can send per campaign so that you can’t abuse that system.
So there you have it. There are a few steps involved, but overall it’s just a bit of clicking around to send a bullet proof great looking HTML email to one individual.

